so for the past few weeks i have been making some 'scape' mirrors for a local gallery to sell. This was greeted with relief that someone believed in my designs and then a bit of a anxious feeling that i had very little time to get three mirrors made to a high standard in 2 weeks. And thats where the pressure begins, working to a tight time frame and also making sure i made them to a high quality to sell. which i had never done before. I was also not making these for myself/portfolio any more, i was making them for someones hall, bathroom, bedroom which also added to the pressure. But with this came confidence, that someone will fall in love with my design and want it displayed in their home for what it is, a unique stylish mirror. So while struggling with adapting the design for sale, making sure tolerances where adhered too, the right glues were used and an effective mounting system was used i had a renewed energy to make these the best mirrors. Usuallly i am not the best person when under pressure but while making these i knew i would get them done and get them done well.
I also had to write a care leaflet to make sure who ever bought them would be able to maintain the finish i had applied and hang them correctly, so this was another area i had not done before and another area of my design i had to think about and consider (it was not all about the making, as i found out). Valuable lessons were learned that i will carry across all my other desings as i try to get them to market. so this experience was a big test for what im trying to do. and hopefully i have passed, we will see. but it was far from just making a mirror as i found out.
anyone else had this kind of pressure? good/bad?
Wednesday 31 August 2011
Tuesday 23 August 2011
inspiring views
so i mentioned a change in direction on twitter for my next blog post and i thought i would just show a few pictures which inspire me and show my interest in travelling and people.
i have been to many places in the world but still have a few more to visit (too many) and i try and take as many photos as i can, from very different vantage points. my favourite being cityscapes as they show you just how small you are in this world and how important and inspiring cities are. The three pictures show rome, munich and toronto and i have these three photos on my desk to remind me how amazing cities are and how much inspiration there is out there. Everytime i visit somewhere new i get so much inspiration and also i watch the world go by and observe, a very very important and underestimated thing to do if your a designer. Because as we all know you have to design for people and you have to observe in my opinion to fully understand them and make your design worthwhile, meaningful and purposeful


i have been to many places in the world but still have a few more to visit (too many) and i try and take as many photos as i can, from very different vantage points. my favourite being cityscapes as they show you just how small you are in this world and how important and inspiring cities are. The three pictures show rome, munich and toronto and i have these three photos on my desk to remind me how amazing cities are and how much inspiration there is out there. Everytime i visit somewhere new i get so much inspiration and also i watch the world go by and observe, a very very important and underestimated thing to do if your a designer. Because as we all know you have to design for people and you have to observe in my opinion to fully understand them and make your design worthwhile, meaningful and purposeful


Wednesday 17 August 2011
low impact draw unit
The next design i am featuring in this blog is the 'low impact draw unit' one of the first designs i made for my many portfolio sites. The idea for this came literaly out of the blue-which is rare for me- while i was trying to think of innovative draw designs. the idea basicaly was to try and minimise the amount of components used in makng an item of furniture, and this design seemed to fit that bill. The draw unit is made out of one piece of OSB board with minimal wastage due to the fact that all of the off cuts are used to make the draw runners. These draw runners work by slotting into the main frame of the draw unit and hence the draws simply slide in and out of these slots and this creates a very minimalist but effective draw runner system.

To add to the minimalist feel the draw handles are replaced with cut out holes and the finish piece is varnished to seal the OSB board. Also with this design i wanted to highlight sustainability as its main selling point, and this is achieved in many ways, from the soya based glue down to the FSC certified board for the construction. i wanted the draw unit to be as cost effective as possible with minimal waste but also not lose any design flair or originality and i think this is achieved. when constructing this it was paramount that an effective cutting list was drawn up to maximise the board being used and reduce wastage to a bare minimum.

This design also leads onto other items of furniture with the same cost cutting features and sustainable elements (these are currently being designed amd will appear soon) including a sideboard and possibly a wardrobe.
construction of this piece was difficult as it was the first major piece of furniture i had made but i learnt from its construction and it still performs as intended. Another feature of this design is that it can be made high end and more emphasis put on the innovate runner system. But i didnt want to make another chest of drawers but make something different with minimal impact on resources. i also tried to make the framework with the least amount of elements to add to the overall idea of being cheap, low impact and concious. But to be honest there are areas that could be slimmed down even more but these will show through on the new items to accompany this design. but even slimmed down, the framework is extremely strong, coupled with the OSB board produces an extremely stable item of furniture.
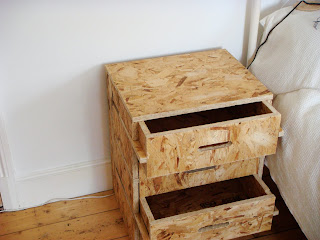
Care had to be taken when cutting and fixing the runner system as this would determine how far the draws opened. So alot of trial and error was conducted to see how far the draws needed to open and how far they could be opened before the unit became unstable and/or the draws fell out. In conclusion a very simple idea and a staple of classic furniture design, but a design that is different in many ways and a design that also inspires other ideas and sustainable practices.

To add to the minimalist feel the draw handles are replaced with cut out holes and the finish piece is varnished to seal the OSB board. Also with this design i wanted to highlight sustainability as its main selling point, and this is achieved in many ways, from the soya based glue down to the FSC certified board for the construction. i wanted the draw unit to be as cost effective as possible with minimal waste but also not lose any design flair or originality and i think this is achieved. when constructing this it was paramount that an effective cutting list was drawn up to maximise the board being used and reduce wastage to a bare minimum.

This design also leads onto other items of furniture with the same cost cutting features and sustainable elements (these are currently being designed amd will appear soon) including a sideboard and possibly a wardrobe.
construction of this piece was difficult as it was the first major piece of furniture i had made but i learnt from its construction and it still performs as intended. Another feature of this design is that it can be made high end and more emphasis put on the innovate runner system. But i didnt want to make another chest of drawers but make something different with minimal impact on resources. i also tried to make the framework with the least amount of elements to add to the overall idea of being cheap, low impact and concious. But to be honest there are areas that could be slimmed down even more but these will show through on the new items to accompany this design. but even slimmed down, the framework is extremely strong, coupled with the OSB board produces an extremely stable item of furniture.
Care had to be taken when cutting and fixing the runner system as this would determine how far the draws opened. So alot of trial and error was conducted to see how far the draws needed to open and how far they could be opened before the unit became unstable and/or the draws fell out. In conclusion a very simple idea and a staple of classic furniture design, but a design that is different in many ways and a design that also inspires other ideas and sustainable practices.
Thursday 11 August 2011
Cant sidetable
So the third design i am featuring in this blog series is my 'cant' sidetable. This has proved a popular design and has attracted alot of attention. The idea for this came to me a few years ago now with the thought process of having the useable surface of furniture detached and reordered depending on what the use of the item was. There was a whole series of pieces based on this concept but i chose the sidetable to make as it proved a easy design to make in terms of size. The main idea of this series from an asethetic point of view was to have the table surface only held from one side and then occupy a void space within that frame to detach itself and reorder the basic idea of a table.
 The original proposal was to have the frame inside the table top and held by one end, but this proved to be too complex from an engineering side to make a reality so i reversed my idea and had the table top protrude from the framework. This also was not an easy idea to make reality due to the obvious engineering principles involved and the idea of making the cantilever structure work. So i made lots mockups to test these issues/ideas and the second photo shows the working prototype i made to see how much weight the table top could hold. Also when i made this mock up i found that this design also had another benefit in that it emphasised the framework of the piece and gave it another function in that you could clip a lamp to the frame or drape magazines over it. So this principle pulled the framework out of the design so to speak and gave it dual functons.
Just to touch on the layout of the frame work, i had played around with different arrangements of how the frame looked and stood and the other designs in this series have different frame designs based on the same concept, but this layout was chosen to give the best possible look to the table to emphasise the cantilever top and show the table top almost hovering in the framework.
 The next phase was to choose the right wood to make the frame from and then find a suitable material for the table top. I chose Ash as it is naturally a very strong, straight grained wood that can colour well and has a smooth finished once worked, the table top proved more tricky though. I could not use glass because at 10mm ( this was the only thickness that seemed to suit so the table top was not lost in the frame if it was too thin) it was too heavy to make the cantilever design work as intended so i turned to acrylic which was strong enough but significantly lighter.
Once the materials were sourced the making could begin and it was a simple procedure of making the frame with strong but simple dowel butt joints, but great care had to be taken to ensure the frame was square and did not list or twist to one side as this would upset the cantilever top.
 Once the frame was made the next critical part was making the slot in the frame to house the acrylic sheet. The original idea would have had the arcylic inside the frame and not showing from the other side, but my tests proved that this was not possible from a strength point of view and to achieve the cantilever principle and make it work the acrylic sheet had to go all the way through the frame work. so a router was used to bore out this slot in the solid ash.
 To secure the sheet into the frame it is simply screwed through into the frame from the bottom to aid the strength and obvioulsy stop the table top moving. Once this finished table was sealed and waxed to protect the wood i tested how much weight could be put on the table top. From my test models i knew it could support a fair bit of weight and found it could hold 2kg, which i think is a fairly big weight for a small side table, so i was pleased with this.
This table like my other designs is available to buy from www.stylisticgallery.com and is also viewable on my online portfolio's on www.hiddenart.com and www.centralstation.com

Just to touch on the layout of the frame work, i had played around with different arrangements of how the frame looked and stood and the other designs in this series have different frame designs based on the same concept, but this layout was chosen to give the best possible look to the table to emphasise the cantilever top and show the table top almost hovering in the framework.

Once the materials were sourced the making could begin and it was a simple procedure of making the frame with strong but simple dowel butt joints, but great care had to be taken to ensure the frame was square and did not list or twist to one side as this would upset the cantilever top.


This table like my other designs is available to buy from www.stylisticgallery.com and is also viewable on my online portfolio's on www.hiddenart.com and www.centralstation.com
Monday 8 August 2011
bedside table
feels like im on a roll at the moment with blog posts coming thick and fast. this post details the most recent design in my portfolio of a bedside table


this simple change of asethetic creates a very strong, unique looking design that is also simple and functional. Sapelle wood is used for this design as i thought it was a perfect wood choice to complement this strong minimalist shape. The construction is all paneled sapelle glued together to form a strong frame with a cupboard and a draw unit. Proportional the draw is a quarter of the whole piece with the cupboard taking up 2 thirds. When drawing this out an important consideration was size and scale as this had to suit many different height and sized beds. Many mock ups were made to finalise the final correct scale. This proved the most difficult part of the design as this also determined the size of the ledges that would form the door and draw handles.

the whole making process was time consuming and accuracy was important so that the draw opened correctly and did not stick and that the door hung correctly too. The sapelle wood was finished with sealer and then 2 coats of traditional wax was applied, this not only emphasised the fantastic grain on the wood but also helped the piece function and gave it a durable finish.
like with all my designs this style is planned to expand into a desk and other items using this striking offset panel affect to create functional but minimalistic items of furniture. I had originally planned for this piece to be made out of OSB board to match another design i have (yet another post topic) but felt this could also work well with premium hardwoods as the photos show.

as all designer/makers know you learn alot every time you make something, and alot of lessons were learned especially working with this difficult wood (make sure your tools are razor sharp) which will make me a better designer/craftmans in the long term
this design will be available to buy from www.stylisticgallery.com very soon and will appear on my online portfolio sites as well, but i hope this blog will show it more in terms of my thoughts and construction methods and give a better insight into me and my career.

like alot of my designs i came up with this a few years ago, but only now have i made it a reality fromjust an old sketch book drawing (8 and counting, another post). the idea came about from an observation that many furniture manufacturers were designing out the handles on items of furniture, and having ledges or indents to open the doors or draws. i felt this was a shame as handles can give a piece obvious individualism and changable style, but also i liked this idea, paring down the design to bare minimum panels and materials.
so my design plays with this theme and takes the main door and draw panels of the side table and simply extends them beyond the boundaries of the frame to create an area to hold and thus open the door and draw.
this simple change of asethetic creates a very strong, unique looking design that is also simple and functional. Sapelle wood is used for this design as i thought it was a perfect wood choice to complement this strong minimalist shape. The construction is all paneled sapelle glued together to form a strong frame with a cupboard and a draw unit. Proportional the draw is a quarter of the whole piece with the cupboard taking up 2 thirds. When drawing this out an important consideration was size and scale as this had to suit many different height and sized beds. Many mock ups were made to finalise the final correct scale. This proved the most difficult part of the design as this also determined the size of the ledges that would form the door and draw handles.

the whole making process was time consuming and accuracy was important so that the draw opened correctly and did not stick and that the door hung correctly too. The sapelle wood was finished with sealer and then 2 coats of traditional wax was applied, this not only emphasised the fantastic grain on the wood but also helped the piece function and gave it a durable finish.
like with all my designs this style is planned to expand into a desk and other items using this striking offset panel affect to create functional but minimalistic items of furniture. I had originally planned for this piece to be made out of OSB board to match another design i have (yet another post topic) but felt this could also work well with premium hardwoods as the photos show.

as all designer/makers know you learn alot every time you make something, and alot of lessons were learned especially working with this difficult wood (make sure your tools are razor sharp) which will make me a better designer/craftmans in the long term
this design will be available to buy from www.stylisticgallery.com very soon and will appear on my online portfolio sites as well, but i hope this blog will show it more in terms of my thoughts and construction methods and give a better insight into me and my career.
Sunday 7 August 2011
business card
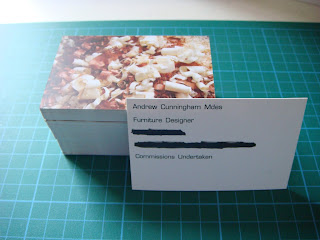
a quick little post here as i wrestle with trying to sort problems of a technical nature out, but i wanted to show/explain my new business card as its quite a big milestone in my journey in trying to become a furniture designer. i spent far too long debating and thinking what it should be like, how it should look. And looking at it now there doesn't seem much to it, but to me there is alot in that little business card.
firstly i decided on a simple photo of wood shavings as the front design, why? well i wanted to show that i designed primarly with wood and to convey a sense of working and physical effort that goes into each of my designs. i also wanted to show that its a beautiful material in what ever you do too it, from the finished article to the waste produced, which can also be used again. But its not really waste as it has already been on this earth for many many years and what ever i do with it i am not adding to the overall carbon footprint of my work/business. So from a sustainable viewpoint, the local wood i buy is very efficiently used with minimal cost in terms of processing and transportation. anyway enough ranbling here.
the back of the card was kept simple with just a name, contact details and what i specialised in (if that wasnt already obvious) these cards were produced by the good people of www.goodprint.co.uk who i cannot praise enough for their help and advice and overall service, so if you ever need some printing done, look them up
so the photo below shows the business card in all its glory and the other 99 i now have to spread around and dish out.
but i will enjoy handing them out as they make all my years of trying to make a go of it look more professional and worthwhile now. so to me this business speaks volume

Monday 1 August 2011
As detailed in my last post i said i would use this blog as a showcase for my furniture designs (amoungst other things) as i have found out that designing a website and running one is very expensive. A lack of funds (well im wanting to spend what money i do have on wood and tools) has meant I am using not only twitter (www.twitter.com/eastdesign )but this online area to get my designs noticed by hopefully the right people.
 So the first design I am going to highlight is the most popular of my designs, the 'scape' mirror series. I came up with this idea about a year ago while wanting to come up with a mirror that did more, whilst taking inspiration from clean lined modernism buildings/designs.
I made the aesthetic link directly to the function. To do this I came up with the idea of having the protruding mirror section consist of magnified mirror while the mirror in the frame was conventional mirror glass. This in turn segmented the functional elements of the design in an aesthetical way. I imagined this mirror to be located in a hall way or traditionally a bathroom.
While researching this project I had a very hard time trying to find some magnified mirror glass and still to this day I am still hunting, as many companies will only sell this glass in large 2metre by 1metre sizes. So unless I have a large run on these mirrors I am having to revert to normal mirror glass and not lead with the dual functional element of this design. I was at first worried about this as I have wanted the mirror to be dual function from the beginning. But after several comments from people online and local galleries I feel the aesthetical quality of this piece shines through and is still a unique design that people want in their homes.
I made several prototypes, which played with overall proportions and protruding mirror size before deciding on the final size. The frame work I have made from various hardwoods including beech, chestnut and American white oak (pictured).
 These woods were chosen for their modern look and timeless appeal. But I can see this working very well with walnut or sapelle hardwoods. The construction uses modern, contemporary butt joints reinforced with dowel pins. The mirror is then slotted into one end and traditional mirror glue is then used to secure it to the concealed baton system inside the frame. This can then be hung directly onto the wall through predrilled holes on two sides, so it can be hung land'scape’ or portrait.
There are two variations of this design the other being with the mirror protruding from the bottom rather than the side (see photo) whilst in the prototype stage I played around with the finish of the wood and decided on a traditional wood seal followed by a wax as this gave a nice matt finish which I think matches the contemporary feel of this design. 6mm mirror glass was used not only for strength but I wanted the mirror (which is quite a large part of the design in terms of surface area) to proportional match the thick wooden frame. So this ratio is kept to a minimum.
 I am currently making four of these mirrors for a local gallery to display and hopefully sell. This has subsequently given me great confidence in my designs. The gallery also liked a lot of my other designs so long term these could also be displayed. So in a sense I am very pleased that someone believes in my designs and likes them. This mirror is also on display on several portfolio websites, including www.hiddenart.com www.coroflot.com and this mirror can also be bought on www.stylisticgallery.com
I have plans to make these mirrors bigger proportionally and maybe not a mirror but a notice board with different stained woods or statement black and white frames.

I made the aesthetic link directly to the function. To do this I came up with the idea of having the protruding mirror section consist of magnified mirror while the mirror in the frame was conventional mirror glass. This in turn segmented the functional elements of the design in an aesthetical way. I imagined this mirror to be located in a hall way or traditionally a bathroom.
While researching this project I had a very hard time trying to find some magnified mirror glass and still to this day I am still hunting, as many companies will only sell this glass in large 2metre by 1metre sizes. So unless I have a large run on these mirrors I am having to revert to normal mirror glass and not lead with the dual functional element of this design. I was at first worried about this as I have wanted the mirror to be dual function from the beginning. But after several comments from people online and local galleries I feel the aesthetical quality of this piece shines through and is still a unique design that people want in their homes.

There are two variations of this design the other being with the mirror protruding from the bottom rather than the side (see photo) whilst in the prototype stage I played around with the finish of the wood and decided on a traditional wood seal followed by a wax as this gave a nice matt finish which I think matches the contemporary feel of this design. 6mm mirror glass was used not only for strength but I wanted the mirror (which is quite a large part of the design in terms of surface area) to proportional match the thick wooden frame. So this ratio is kept to a minimum.

I have plans to make these mirrors bigger proportionally and maybe not a mirror but a notice board with different stained woods or statement black and white frames.
Subscribe to:
Posts (Atom)