time for a brief update since my last post which detailed my 'fort' candle holder which currently i am making in bigger versions to sell on my online showcase at www.stylisticgallery.com I have also started to make some desk accessories now as i have had many ideas in countless sketch books that i just needed to make, out of all the scrap tropical hardwood i have left over from previous projects. My descision to make some smaller items didn't come lightly as i wanted to try and continue making bigger items of furniture but with limited space, limited time and resources i have to just market what i have at the moment and pusd on with my commission work.
So whats left of the summer sun is used to good effect at the moment crafting these desk accessories which will of course be online as soon as they are made. Deciding what accessories to make in an age where working has changed dramatically due to mobile phones and the such, proved difficult and if any one has any suggestions to other items of desk accessoires that could be made let me know. As it was a tough decision coming up with designs that were needed on a desk in this day and age that could be used by a wide demographic. So i concentrated on function and pared down style and letting the wood speak for the design. As i see these accessories as a fairly high end aesthetic that suits the tight grain of the sapele wood i need to source some leather to add to these designs so they can be used on a variety of surfaces. As with alot of what i do its all new to me making smaller items so its a big learning curve for me, but one i am relishing. So i am hoping these accessories will represent a new direction in my work, a move towards smaller items that can be crafted from more expensive hardwoods and also show off my creative thinking.
while constructing these new designs i am also continuing marketing my work which is viewable on www.craftcentral.com and trying to find other shops and galleries to show my work. It will take a while i feel. I am also gearing up for the brillaint london design festival. I have alot to see as i won't be exhibiting my work so i am going along to check out what everyone else is doing and pick up loads of tips and ideas. You can learn alot from just watching and observing remember. It will be a great time in the big smoke as the world has been centred on the city it seems, i will hopefully get a chance to walk around the olympic park and marvel at the architecture too.
so a busy few weeks ahead, but the goal is still the same. the journey continues
Sunday, 9 September 2012
Tuesday, 28 August 2012
scrap wood done good
If you have been following me on twitter and reading my blog
you will know that I haven’t got any major furniture making to do at the moment
for clients or shops so I thought that it would be a good time to try and use
up all the scrap wood I have accumulated over the months and also try some new
ideas out that have been in my sketchbook for a while now. Most notably desk
accessories and oddly, candle holders.
Now this isn’t my usual bag so to speak as I would much rather be making a nice desk or table but there is only so much furniture a man can make and store! Without being overrun with it all and nowhere for it to go. So turning my hand to something smaller seemed the logical step.
I have lots of scrap wood lying about from Sapele to American White Oak and the overriding thing that struck me was I wanted to create some objects that did not detract from the overall look of the wood (the grain, pattern, form) so I played around with simple ideas where function was the leading aspect, so the wood stood out.
As many of you know
my favourite tool at the moment is the router. Such a versatile tool and one I have
used to great effect in other projects detailed in this blog, so I knew with
this tool I could create/change an object without taking too much of the wood
itself away. And still leave something unique and usable. So I simply and if I’m
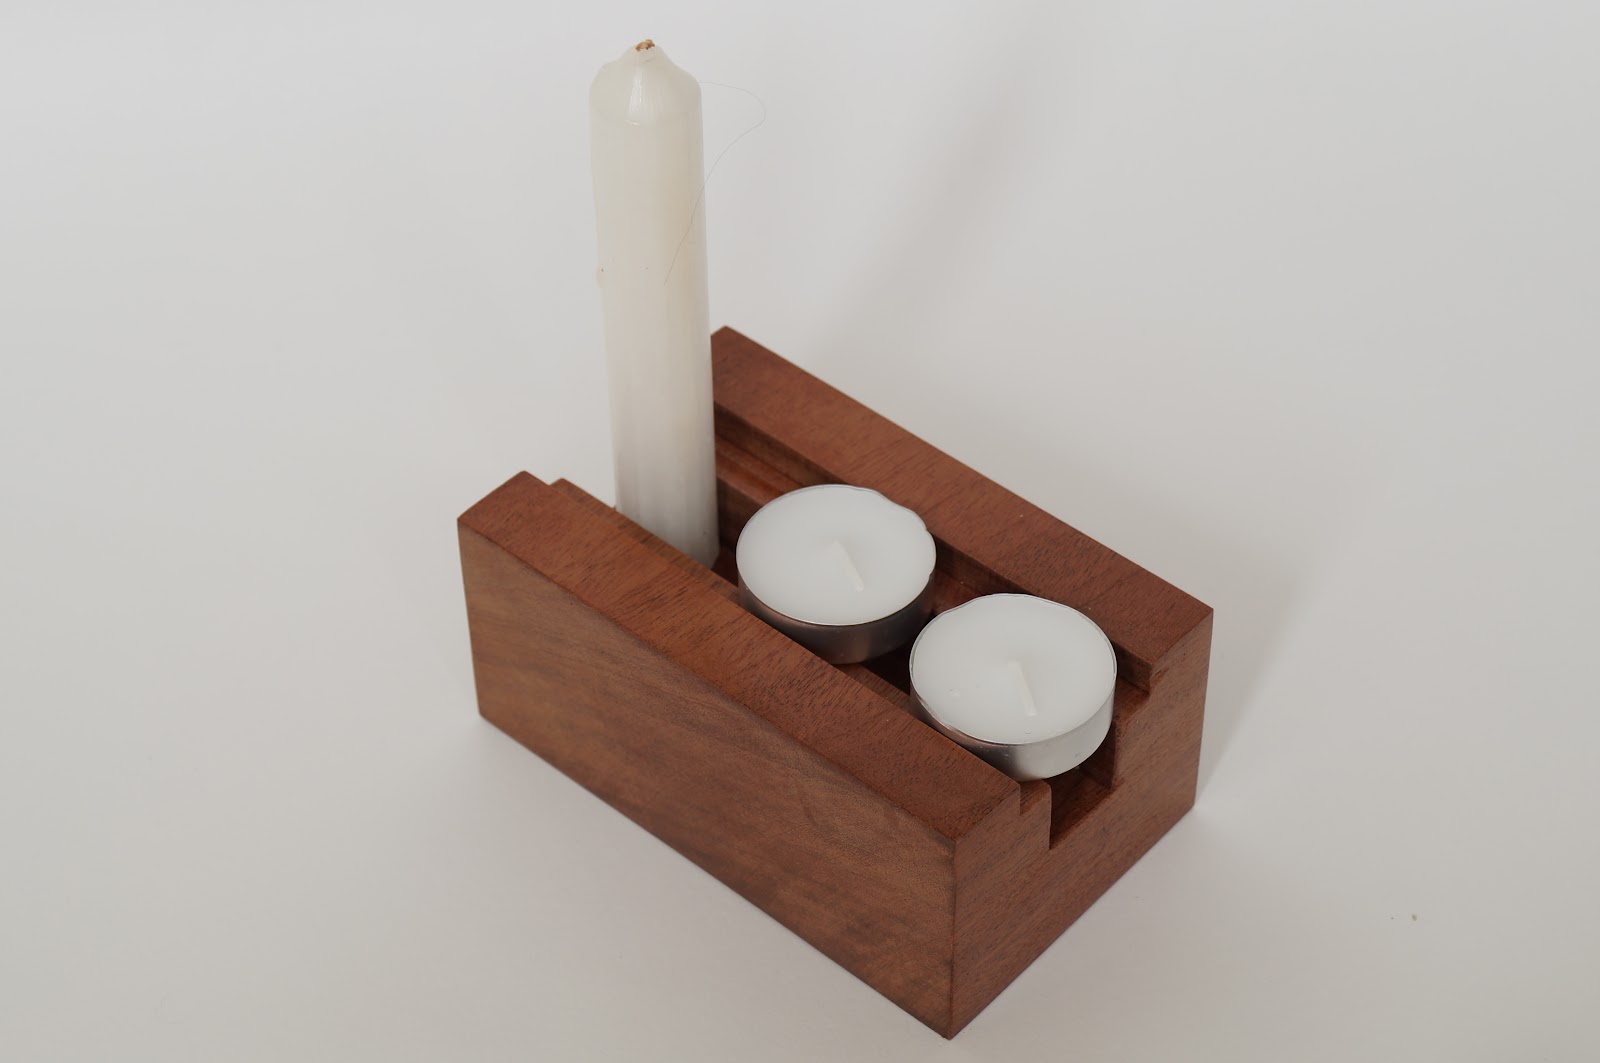
honest quickly created what I like to call the fort (because it looks a minimalist
castle) it’s a very basic candle holder made from a block of Sapele wood (but
any wood could be used) which has a section cut right through it to house,
crucially two different types of candles. This was important. I didn’t want
such a basic design to be basic in use so having the option of it using normal
candles (wedged into the first cut through section) as well as good old tea
lights in the second cut through section, gave it a little bit of customisation
(see photos). The idea is to have small forts dotted around a table or area, and
also long fort sections that house 10 tea lights or more, or a mixture of
normal candles in a row to create a modern simple (and a little bit dramatic)
light source.


To me this basic design was pleasing to the eye and gave new
life to old scraps that I would have never known what to do with. I intend to
display this design and its bigger brother on the numerous portfolio websites
and then hopefully get it ready to be bought on the great www.stylisticgallery.com
Monday, 20 August 2012
the writing desk
Finally another blog post I hear you cry, I know it’s very
long overdue again but I have been very busy making some of my designs to show
in another local shop. The Living rooms is a fair-trade sustainably sourced
furniture shop that stock a large range of furniture from outdoor to dining
ranges, and they approached me to see if I was interested in showing my designs
in their vast shop, I jumped at this chance and so if your ever in Norfolk you
need to pop down and have a look, my work will also be featured on their
website too. So it’s really good news for me, meaning my work is being showed
in more shops now and not just online, so things a are looking up in terms of
getting my designs out there.

Now back to the point of this post, to detail the design of
my most recent design I did for a client in Yorkshire, a writing desk. The client
approached me after seeing my designs for the ‘cant’ side table and console
table and asked if I could come up with a similar design for a desk. Obviously I
jumped at the chance as it was my first commission and I really needed to start
making bigger items of furniture too. So
i sat down with them and sketched out a few ideas and found out exactly what they
wanted from the desk. This took a few hours as I had to factor in the restraints
of space I was working with and what they were hoping for, so a big compromise
all round. Once they were happy with the initial idea I made a quick mock up to
make sure I had the ergonomics spot on and the overall form was to their
liking. Unfortunately I don’t have any photos of the mock up but it was very
basic and proved a point. Thus making the next stage much easier in working out
the final dimensions and how the design was going to work.

As the ‘cant’ design series relied on the cantilever principle
I could not adopt this technique to the desk, because it would require an
extremely heavy and robust frame to support the cantilever and the frame work
its self would have to be very thick to take the weight that the desk would
have to support, so I came up with an aesthetic idea of the having the desk top resting on the
framework but still fixed inside the frame at one end like the side table and
console table this desk takes it inspiration from. So then ensued a lot of CAD
work to figure out how to make this resting idea work and work out the final
details.

The client chose the
wood (sapele) which pleased me as it’s a wood I like to work with and have a
lot of experience with so was confident in working with it to produce a bigger design
to what I am used too. And the client
was also happy to use 10mm thick acrylic as the desk top (the same combination
used on the console table) which not only suited the overall look (an abstract
minimal form) but would add a significant amount of structural support to the
overall design. As the frame work I was
proposing was unproven and I needed to make sure the design was rigid enough to
be used every day and support a fair amount of weight (books, laptop, printer)
etc. So more CAD work was needed to assess the need for a central support which
would run along the bottom, this not only unhindered the overall look but provided
vital rigidity.

Once all the design and CAD work had been done it was time
to start making. I acquired the sapele wood from my local wood yard and ordered
the black acrylic from a local company. As this was the biggest project I had
done I felt a bit daunted by the overall project in hand but I learnt so much
from the whole process. Making the framework was quite simple and just needed
an extra pair of hands when it came to gluing. The difficult part came when I had
to marry the acrylic to the frame work. It required some tricky routing and
drilling and because the wood is such a strong contrasting material against the
acrylic I had to design in some features to allow the frame to move and shrink.
But after a lot of head scratching and huffing and puffing the basic desk was
complete and all that was left was to conceal the fixing bolts (by veneering the
top brace at the back where the acrylic sits inside) and then finish the bare
wood with Danish oil. This beautifully darkened the sapele to add depth and
worked amazingly with the gloss black acrylic.


Saturday, 4 August 2012
the return
It's been a long wait but finally i have time to write a post and update everyone on a manic few weeks and explain why i haven't been on here for so long. The last post explained my design and construction on a commission desk i was working on for a couple in leeds. the desk is now finished after a stop start project which resulted in a few more weeks added to the timeline than i would have liked. But the main thing is i am overly pleased with it, as it was the biggest thing i have made to date and came out better than expected. Below are some photos showing the desk in various stages. All that is left for me is to take some professional photos of it and get it up to yorkshire. Than i can add it to my portfolio and then have the encouragement of making bigger items of furniture in the future.


I will put the professional photos on here in due course but i want to just explain what else i am upto and why i havent been on here for so long. As regular readers will know its a long journey to try and get recognised in this discipline for me and i have been trying to contact galleries and shops to hopefully promote and sell my work. It will take time but luckily i have found another shop that wants to display my work in an exhibiton/popup shop. It's great news and means another person believes in my designs and me. So im busily making two of my 'scape' mirrors and a 'cant' sidetable to display in this shop. It's exciting times but means my time is limited now, having to make 3 items of furniture to the best of my ability and carry on working means i have had to make some cuts in what i can do until these pieces are made, but i have made some time to write this and will try and devote more time as its important part of my development and getting my designs out there.
The wood i am using to make these three pieces is the lovely beech wood, luckily i had a spare piece knocking around the workshop which was just the right size to make these pieces. the following photos show some progress work and some of the joints that i have been working on (trying to improve consistency and quality at every opportunity)


One thing i have done is completely redesign the construction of the 'scape' mirror to improve the ease of making it and the overall integrity. The redesign has proved successful but one thing i am learning is that the design constantly changes along with the wood i use. So this redesign will change again i reckon as i understand how the mirror glass reacts with the frame and how i need the frame to be independant to a degree to work with the wood. But the overall improvements were much needed and have improved the aesthetics no end. As always photos of the improved design will be posted on here. But my days now revolve around oiling the sidetable frame and mirror frames and getting them delivered to the shop and out in the public eye. I have also made some promotional postcards to accompany my designs in the shop which all helps in my plans to get notcied and sell my designs. As always i am learning alot about this massive industry but more importantly my designs are holding thier own and looking good as they take me further afield beyond sleepy norfolk.
Sunday, 17 June 2012
major update
This post is long overdue as a lot has happened in the past few months and the major thing is the construction of the commission desk which is based on the principles of the 'cant' series. at this present time the making process has grinded to a halt as i was not happy with one leg section that i glued together so i need to at some point travel down to my local wood yard and get some more sapele to make this section again.
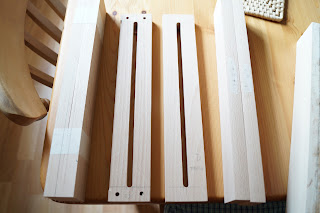
but i will start detailing what i have done and how far i have got with some photos showing the processes. the section of wood i got was a lovely piece of solid sapele, which i knewn was an important piece to buy as i didnt want to make the desk from different sections. i wanted one piece to cut every part from. so that was a good buy. The next stage was to divide it up into equal sections to cut down. and then cut down further into the sections.


this was a tricky process as the section i bought was quite long so i had a task of lining up fences and making sure i good get a straight cut on each pass as i had to cut the sections about 14 times to get the frame work all 32mm in section. so alot of sawdust was produced!! once that was done it was a difficult case of looking at each section and pairing them up to try and achieve a square,equal desk once it is glued together. the original piece of sapele wood had a bit of warp and twist in it but some sides were quite good so i was able to cut on the clean sides and remove some of these bad sides but i still had to assess easch section so i had a fair chance of getting some straight legs and brcaes. once this was done i was laot more happy and confident with the rest of the build.
i then started to glue the sections together once i had spent mpore time making sure my order of build was the right one as i had to think ahead to make sure the desk top could go in and the holes could be drilled and also make sure the sections i glued could be supported and not be a hinderance, as this is the biggest thing i have to date.

once i had figured out the best way to clamp the sections i used a dowel joint and good old wood glue to assemble the leg sections but as mentioned earlier for some reason one leg arrangement did not glue as intended which i think has something to do with the clamps not being central and having too much play in them. But its not the end of the world so i carried on with cutting the slot for the desk top and drilling the holes so it could be bolted in. Also the polishing and drilling of the acylic top took a a while but the finish is very good and its heavy which is important for the overall stability of the desk because the leg arrangement is quite light.


so i am at a stage now where the major cutting and drilling is done and all that is left to do is glue the remaining sections together and assemble the acylic desk top. its been a major project for me but i have loved every minute of it and have learnt so much from doing this. my other project for a console table has taken a back seat at the moment but now i am near completing this desk i can then concentrate on the console table and then get back into the swing of making more concepts and promoting my work. so the next blog post will hopefully be a full photo evaluation of the design, overall appearance and explanation of the design intent.
Saturday, 12 May 2012
new concept
when i first started this blog i outlined a number of things i wanted to do on here and one of those things was to show concepts and prototypes based on my design thinking and where i wanted to go with my furniture design. So this post details a new concept that i have created in mock up form. The basis of this design was to explore my interest in the muti functional, adaptable designs that are sensitive to material usage and life span. So this piece takes these ideas and thus creates a simple minimalistic style of table/functional object.
The idea is to use a basic strong cube frame arrangement and have a designated area to be a usable surface, but this surface extends past the frame work to highlight its obscure postion and encourage the user to adapt their interaction with the design. I have also incorporated a slot in the front arm of the cube to emphasise how the surface is fixed into the cube but also to possibly highlight a weight saving option of the design (sustainability here as well) and again an adaptability by adding an extra surface/functional aspect to the cube. Thinking about it the postion and size of the surface area also highlights the need for furniture to possibly be more dynamic in size/shape to deal with peoples changing usability in that people drap,hang,lean things on or in the furniture. I think people try and find more uses for individual furniture items now and a typical side table/console table for example is being asked to do more in different environments than what it was originally designed to be in.
The other reason for the surface being located on one side is to encourage the user to work the inside positive space which can be percieved as negative space. By putting a lamp through the frame or leaning an umbrella or simply displaying a plant inside adds a totally new dimension to the idea of a seperate table and makes the design interact more with its surrondings.
I suppose this concept is a collection of various ideas/ideals and my attempt to try and convert these into a physical form. I think it works in that it keeps to my aesethetic minimalist, modernist style and it paves the way for a future complete design based on this conceptual statement. I also love the idea of having the surface areas of tables/functional items obscured or not ideally placed within the framework and overhanging as this encourages a different interaction and hence creates a new design identity based on usability. Changing how the piece of furniture is used or percieved.


Saturday, 5 May 2012
Again its been far too long since my last post so its long over due i update this and explain what has been happening. As is usual for me i have two projects on the go. The first one is a commision i am working on for a desk for a client in leeds, i made a very quick mock up that was completed over a weekend and i then showed this to the client last weekend to get their initial recation in terms of size and overall appearence.
The design is based on the 'cant' series of side tables and console tables i have designed recently and takes the principle of the cantilever construction but adds more structure to it so it can be used as a desk and support alot more weight. As it was a commison piece i was working to some restrcitions, mainly the size of the desk and the materials used. They decided they wanted the frame to be made of sapele wood, which i have used before and clear acrylic for the desk top. Thus providing a good contrast and that should result in a very unique and modern design.
Since i last wrote the above paragraph the clients have decided to go for a black acylic top now, based on my 'cant' console table, so i can now start sourcing the sapele wood and ordering the acrylic and tyr and have this made before the queens jubilee, but trying to source the wood yesterday resulted in me driving all the way to the big smoke to find they were shut, so the timeframe has been put back by a few days more. but it promises to be a great, unique design that i will show on this blog soon.
The second project i am working on is a new design for a console table and subsequent furniture pieces based on an asethetic which will run through this range, i posted two photos on twitter a while ago showing the mock up i made from good old chipboard, which is not the nicest but it is cheap and quick to cut to shape etc. The design is quite simple but the detail/overall appearance lies within the use of two contrasting woods and the relationship between them, one slightly hidden, the other promoting strength and the overall feel.
Again since writing the above paragraph i have cut the main sections of wood for this new design from good aold sapele and a new wood im trying, iroko. which so far seems to be a very good wood to work with and has a lovely grain/patina to it. so now its just a case of joining them together and making the inner section.
My designs seem to have a simler aesethetic to them just recently and i think its because i am trying to concentrate on making furniture that appeals to people's interaction with it and the relationship they have with it over time. So in a sense you could say im concentrating on the functional aspects but also adding a unique and different appearance. so now the hard work graft begins, the drawing and planning, researching and thinking is over and i just have to knuckle down and get them made, as always i will update the blog with photos and descriptions of my progress as well as a new prototype idea i am working on which i am gluing up as i type
Subscribe to:
Posts (Atom)