Monday, 27 October 2014

oak and Walnut Hat stand

its been a very long time since ive updated this blog but my latest design is a perfect excuse to write a blog post about this unique design that im very excited about. As with all my designs they start with a sketch and usually get forgotten about in numerous sketchbooks and scrap pieces of paper but this design came about from experimenting with a unique tool i have to create screw threads in wood. i already used this tool to make my multi purpose coat racks but always wanted to use it more effectively and this idea for a hat stand seemed a no brainer to me. A design of coat stand that could accommodate numerous pegs and accessories but also satisfy a wide range of users who i've found from previous designs, like the individual function led creations i make with the extra features to allow the user to use the design differently and in 'their' way and make that simple house hold staple (the coat rack) much more desirable, useful and hopefully prolong the life of that piece through engagement and the user finding a deeper relationship with that design.
  Back to the coat rack. As above i wanted a hat stand that did more than just hang coats and the screw thread principle allowed me that freedom of designing a multi use 'frame' that could have features and tools added to it. This frame idea is key and thus the backbone that allows for a multi use adaptable piece of furniture i was looking for. So not only can this design be used for adding coat pegs or umbrella hangers (see pictures below) but other wooden 'tools' can simply be screwed onto the top quarter section of that frame to change it into a garment hanger or even a lamp stand. The possibilities are quite big with this design which is why i am so pleased and excited by it.
  Back to its main use as a hat stand, i chose oak wood to make the main collapsible section of the stand and a section of walnut for the top quarter screw thread section. The whole frame flat packs down and screws together using that unique screw thread tool. I wanted this feature as a main requirement to hopefully sell this on my folksy shop, so the need for compactness in posting was high.
  Once the cross base unit is screwed into the 1st section of oak dowel, another section is screwed into that and then simply the walnut threaded dowel is screwed into the 2nd section and the frame is complete. The user then simply screws the coat pegs, umbrella hangers onto the walnut section at the desired height and orientation, meaning the hat stand can be placed in any position allowing the user access to their garments without having to walk around the stand.
  The photos below show the stand with the umbrella hanger, scarf hanger along with a standard 2 peg coat tool. there is no limit to how many tools can be added to this frame depending on the users requirements. Im now looking for somewhere for this design to be used in its correct context so i can observe its operation and adapt if necessary, then make more 'tools' for it so it can be used as another piece of furniture. An exciting future for this unique design.


Thursday, 22 August 2013

let the wood tell a story

So it’s time to show and explain another design which I have just completed, and only just photographed. It has no name as yet, so I will just jump straight into detailing my thinking behind it and the reasons for it.

  A lot of the wood I obtain from my local wood yard are small manageable pieces (offcuts sometimes) because I as yet don’t have the capacity for too large a stock of wood, so I tend to purchase the smaller sections of wood that I can make small items out of and leave the bigger sections for my fledgling commission work. The trouble with these smaller offcut sections I buy is that what there is, is what you get. So you can’t really specify the size you want- it’s that size or you buy a massive piece of wood and cut it down- which I find people shy away from.  So with this in mind I wanted to turn my attention to the redundant sections of wood that are fresh from the table saw, that are cut off to obtain the bigger sections (the waste material). Uneven lengths, roughly cut, untreated and just ready to sell as they are, ungraded etc  etc. I thought why can’t the consumer have a closer connection to the wood, and understand/know where the wood has come from and what it goes through to get to them?  Why can’t I show that the discarded offcuts of wood can still be used but also worked very minimally to produce functional, unique pieces of design- that are just as attractive as the straight edged, perfect sections of wood? -and retain their origins/routes back to the woodyard/human interaction they had to get their shape. A lot of questions! So I decided to design and make a product that used these rough redundant offcuts of wood and adhere to a minimal interference ethic to produce a coat rack.
 
 
So basically the wood of this design (English oak) specifically the back plate (which shows some lovely heart wood graining) and the shelf are as they were, from the wood yard floor. I haven’t cut or treated the back plate; all I did was sand it and oil it. So the ends are still painted from the wood yard (which gives a unique identity to it) the edges and end faces are not straight, so viewed head on it’s got a natural bow along the length. It’s untouched as much as possible by me, to give that connection to the user of where it’s from and demonstrate that not all materials have to be planed, sawn and treated to strip the identity from it to obtain a perceived aesthetic.


Why can’t the rough edges, half painted ends be seen as an attractive individual quirkiness, appealing in a way?


So once I had prepared this piece of wood which was randomly bought by me from the wood yard as I liked its appearance and uniqueness, I set about taking one of my previous ideas for a coat rack and adapting it to a larger scale. And incorporate a unique feature into it by way of an adjustable shelf that lies across the screw in pegs. This gives the design a great added functional element to display or place items that are needed close to hand, keys, letters, phone etc. So like my previous coat rack design this gives the user options that other coat racks don’t have.


I simply drilled eleven hols along the woods length, placing six together at one to maximise the storage space along this predetermined length. Then using my great little wood threading tool I made 11 pegs (the only part of the design that has had industrial machine contact, if time and resources allowed I would have turned this pegs by hand) and put the screw thread feature on each of them so the user can customise the rack to their individual requirements and place the pegs and hence the shelf where they want. Lastly the shelf, which again was made from an offcut, was routed to achieve 3 slots in it so it can attach to the pegs anywhere along the length. The whole design is finished in Danish oil to protect the wood and enhance that lovely heart section. The unit can then be secured to a wall by means of simply using screws that are concealed behind the screw in pegs.

  The result of all this…a very simple concept which importantly uses very simple construction methods and minimal involvement by me, which was one the original requirements/challenges of this project. So on first view this design looks unfinished, messy, untouched in away, and maybe of poor quality. But by being this way visually, it allows the user to understand where the wood is from and what it goes through, it demonstrates that you haven’t got to disguise the journey of the wood, from tree to table so to speak and it allows a closer connection and understanding of what goes into the production/manufacture of wood and wood based products. Hopefully changing people’s ideals and cementing the notion that every piece of wood can be attractive and used purposefully and still be just as desirable as a machined piece of design. Which could be seen as being stripped of its personality and history? Not allowed to tell the story of its industrial life.

Be sure to follow me on twitter, instagram and Google plus. All links to these can be found on my Google plus page.

Tuesday, 9 July 2013

the pulse coat rail

Back when I started this blog, the idea of creating it was to showcase my work and explain in detail the designs I make. It’s been a while since I last made a new design but finally I was able to take some photos of the completed design which are shown below. And I will explain my newest creation and the reasons for it in this post.

 
It’s called the ‘pulse’ coat rail and the aesthetical inspiration behind it came from the digital readout of heart rate monitors and medical devices, with a continuous line spiking up and down the screen to register heart rate etc. I had the idea in my sketchbook for a while and finally decided to develop it into something workable. I hadn’t worked with metal before so I spent quite a bit of time researching into what I wanted the metal to do and how I was going to do that. And it soon became clear from numerous mock-ups that I couldn’t shape the metal to the aesthetic/functional requirement I wanted, so I hunted down a blacksmith. Luckily I found one two minutes’ drive away from my home and he was happy to shape a piece of a metal to the design I had drawn up.


The most important and taxing part of the project was working out the profile of the rail and how it would function and accommodate coats, hats, bags, clothes etc. and anything else that might be stored in a hall way or with peoples garments. The reason the rail is designed like this is by the way I observed people using coat rails and stands. People seem to just throw their coats on hooks and stuff scarves, gloves into pockets and hook bags on top of the coats they have just hung up. People don’t seem to use the loops provided in the back of jackets anymore, and just seem to throw/push their garments onto the stands/hooks and carry on with their day. I observed this in my own home, cafes, and public places etc. So I wanted a design of coat rail that accommodated this ‘bunching of clothes’ and ‘hang it up and forget about it’ mentality. Also I wanted it to accommodate other items like bags, gloves, even letters/papers. So people could quickly discard their over garments without having to physically think about hanging something up, the garment would just drape onto the rail effortlessly. And that’s where the loops, horizontal sections and continuous line of the design come into play. The user determines how to use the coat rail; they can loop, thread or stuff their belongings into and around the metal profile. Hang bangs, stuff letters or newspapers into the rail. And subsequently from my trials, hang a large volume of items from this design, more than conventional coat racks/hooks. I trialled many different profiles, using thin sections of wire I could bend by hand into shape before deciding on the final shape shown in the photos. It allows varying amounts of items to be stored along its length due to some straight sections and a few traditional vertical sections for coats to be draped over.


Construction wise, this was a fairly simple design to build, the metal element was made first and luckily it was fairly spot on to the drawings I supplied the blacksmith. So once I had the finished metal section I could make the plinth to mount it onto. Sapele wood was chosen as from working with this wood before I knew it produced a wonderful finish and machined well. I wanted the plinth to be a lot smaller in proportion to the metal section so the design of the loop stood out. And I knew the metal section was not too heavy so the wood plinth would easily support its weight on the wall, via two screws.  


Overall I’m very pleased with the design and the look of it. Originally I wanted the loop element to do just that, ‘loop’ from vertical to horizontal (effectively flow along the wood) etc. With big radius’s between the transitions, but I was limited to what radius’s could be created due to the limitations of pipe benders and the minimum radius’s they could bend too, as this would have to be fabricated in one piece. So the decision was made to bend at right angles to allow the full shape to be made without the limitations of the machine hindering it. I am currently working on having radiuses between the transitions to give a more flowing aesthetic (finding the optimum radi that can be machined will take time ). I am also looking into getting the metal section made by a metal fabricator who could then possibly powder coat the loop, to give some bright/bold colour options against varying types of wood plinths. Resulting in a modern, stark appearance to further enhance the scope of this simple but highly functional design.  

Thursday, 13 June 2013

my week off

So this is my second week off in 3 weeks and as always its very busy with design projects ongoing and places visited. so this post is just a recap of whats been going on. I stayed at a very posh hotel called down hall in hertfordshire at the beginning of the week and walked around a great forest in hatfield. If you look on my flickr account http://www.flickr.com/photos/eastdesign/ you will see some of my attempts at capturing some images of my travels. And i ended up in deepest darkest suffolk yesterday for some posh food and walk around some antiques shops, as its always interesting looking and researching old furniture i find. but while going here there and everywhere this week i have always got my design projects in the back of my mind and my sketchbook in tow. luckily after a slow start my current project for a variation of my coat rack is finally moving somewhere and im visiting the local blacksmith at the end of this week to see if he can start making the metal sections i require, so keep an eye on here and my twitter feed as it progresses. https://twitter.com/eastdesign  its been a while since i had a new project to show/promote so looking forward to getting this design out there.
  Also i have acquired a new mobile phone so i can now start adding to my instagram feed as well! (social media overload here) so keep an eye on that as im off to cambridge today to catch a show and have a look around. Always a great place cambridge. Some great funky shops which is always a must for designers to look in, to see whats out there and whats selling. And the river cam is always a great place for photos and people watching so expect some photos from me tday on my twitter feed. Then at the weekend im off to centreparcs which is nearby in thetford forest. A family/friend thing which im not really looking forward too, but the scenery should be lovely and will give me a chance to play around with my camera and the HDR settings on it (a mine field indeed)

so a very busy week which is great but means my holiday is going vey quickly and to be honest i wish i could have a week in the workshop to really progress all the ideas i have in my head and sketchbook. but thats life sometimes. best make my way to cambridge and enjoy the sun

Tuesday, 4 June 2013

a week off

So last week was a holiday for me from my day job, and I had a lot to cram into it, including being best man at my brother’s wedding. I won’t go into too much detail but it was a great day that I will remember forever and importantly the best man speech went down well. So a perfect day but I didn’t get any wedding cake!! Apart from doing other design related things including hours in the workshop and visiting blacksmiths, I took a day/half a day off and went to Southwold which is a gorgeous seaside town in Suffolk which I adore. I went there with the camera to get some inspiration and see what was new as I hadn’t been for a while. Included in this blog post is some photos I took, and to keep the design theme of this blog alive I have included two photos (should have taken more really) from a new coffee shop I went into called the two magpies bakery. www.twomagpiesbakery.co.uk/  As soon as I walked in it reminded me of the artisan coffee shops you find in London, with the open counters and fresh baked goodies to tempt you in. but one of the reasons I was tempted to go in was for the coffee. I am a coffee snob so was hoping to find somewhere closer to home that serves proper coffee, the only other place is honey and Harvey in Woodbridge,  But the two magpies did not disappoint, amazing coffee prepared properly from exotic blends. The other reason why I went in there was for the design of the place. For a start there was a theme of recyclability/reusing with the quirky idea of using rolling pins as coat hooks as you walk in, but what struck me the most were the tiles on the walls (see photo) just simple plywood slats about the size of a beer mat layered up like roof tiles. A simple but stunning look was achieved. Also the shelf stood out for me. Obviously a sculptural piece with the white rods representing a nest to tie in with the name of the bakery. But a large striking feature in this unique little shop. Which I loved. And don’t get me started on the tables and chairs! Again simple paired down designs with tubular wooden/trestle legs painted half way up with contrasting colours to add a modern minimalistic feel to the shop. Really great. Even the counters were made from what looked like reused plywood all tied together with simple white walls and pale colours for cushions/pictures. If you ever get a chance to head down this part of the country pop in, it’s a great little place. I will definitely be back there as I have to make more of an effort to go to Southwold regularly.


  The rest of my photos from my day trip/week off can be found on my Flickr account www.flickr.com/eastdesign  whilst on the topic on Flickr I really like the new redesign they are rolling out. Making the photos stand out/be more prominent and having some lovely little graphical icons to tie it all together. Great layout too with the changeable banners. Look out for more photos on there soon as I try and remember to take my camera everywhere I go, just like I try and remember to take my sketchbook with me. Also I need to put all my photos back on this blog as for some reason they have all disappeared! That will take a while! Trying to get the bottom of why they disappeared but can’t think why. Very frustrating.
  Don’t forget to keep an eye on my twitter feed to see what I’m up to design wise and day to day ramblings. just to note, for some reason I could not upload any photos to this blog post, so I need to look into that but please look at my flickr photo stream as this has all the photos from my week off including the ones showing the great design details in that coffee shop I swooned over. hopefully technical issues will be resolved soon

Tuesday, 28 May 2013

long over due

So I am not going to begin to explain why this blog update has taken so long and I am not going to bore with you excuses either. What I am going to do is detail what I have been up to, what I am doing now and what I hope to achieve this year.

So the last update detailed that I was going to try and do some smaller projects while the commissions slowed down and try to promote my work and also see if I can get it displayed in more local shops. This as always is an ongoing/slow process. Currently my work is taking up a lot of space in my workshop and I am still searching out shops and galleries that potentially could show my work, but I feel that it will take time to get noticed. So all I can do is continue working away doing small designs from my mountain of sketchbooks that I have and see what comes of them.

  So currently I am making a variation of my popular multifunctional coat hook that is detailed in previous posts on this blog. It involves using my trusted material wood and a new material to me, metal. This means I needed to track down a local blacksmith. Luckily I found one only a few minutes down the road from where I live! so while I am on holiday from my day job this week, it gives me a perfect opportunity to get this latest project moving and involve a local blacksmith to make a piece of the design that I currently cannot. When the design is finished I will show it on this very blog. I am very excited about it and hope it continues my ethos so to speak of unique functional designs that play on how people live and interact with their surroundings in this fast paced world.

 Also I am going to make a few new mirror designs too. My previous mirror designs –Scape for example- proved popular and I have so many ideas for new designs. Not only that, I have a local supplier of mirror glass and so much wood to use! (I seem to buy wood like women buy clothes at the moment!) So I thought I would do something I have experience in and know I can make well, so look out for these in the summer months. Summer months I hear you say! I know we haven’t had the best weather this year so far but I’m hopeful.

 As I mentioned above I am still hunting out commissions and have had a few interested people requiring quite unique items to be made but its not as easy as a few phone calls and a quick sketch. But I am learning all the time how to approach people’s requirements when it comes to making something and I know they will come thick and fast soon. Until then I continue to promote myself on here and twitter to name but a few social platforms that have proved fruitful in gaining recognition and interest in my work.

 Also in my last post I mentioned I had setup a flickr account which I have been slowly filling with photos and more will appear on there soon. So keep on eye out. Also I have acquired an instagram account too, so all I need to do is get a phone that can run the instagram app!!!! And then fill it with daily inspiration, images of my journeys and design projects. Its annoying and frustrating that I haven’t sorted this out yet but I will and I am looking forward to sharing my design journey in a different way as I know it will benefit me long term.

 But the main thing I am going to do more of is keep this blog regularly updated. I know I have said it before but I will make a bigger effort to keep this going now as I have a jam packed summer ahead of me (fingers crossed). So as always keep an eye on my twitter feed which will link to this blog as new posts arrive. But the most pressing big thing I have to do this week is be a best man at my brothers wedding!! Wish me luck! A post will appear on here when my best man duties have been fulfilled!


Thursday, 31 January 2013

new year slow start

Well this is a very long over due blog post after the last one was back in early december! but here i am and ready to update what has and hasn't been going on in my creative journey. So the last post detailed some car design views about the new car i had purchased and so far the car is exceeding my expectations. And the post proved popular so i will do more blog posts reviewing designs and giving my views on them and they reasons why, how etc.
  But back to my news, i had a quiet christmas taking stock of what i had done that year and what i needed to do this year. Then the bad weather came which put paid to any workshop time i had planned in my freetime as it was so cold and to be honest motivation was low at that point, and since then i have not made anything new and instead have been concentrating on developing new ideas and taking stock of what i had to do in the coming year. I had a quick trip to north norfolk the other weekend to pick up some old pieces that had not sold in one of the shops that stock my designs. So i am in the process of sorting all that out and then listing it on my various design pages on www.stylisticgallery.com and www.folksy.co.uk once they are listed i can then start to design and make the new ideas i have been thinking about for too long over the cold winter months. One thing i have to do is use up the piles and piles of old wood i have lying about as i am finding wood prices have increased slightly round my way and so i am having to make sure i do not end up with too much stock but also try and make new designs to promote. So in this quiet period i am sticking to making small managable designs like my candle holders and also making some small items for my own use as im trying to find a new flat so i thought making some furniture would be a good idea and would show off my making skills too. alos i am planning to sell some of my designs at a local craft fair in the spring so more news on that later in the year. Apart from that i will continue advertising my designs that are for sale on the above websites through twitter and this blog page.
 Also i have started a flickr page which i am going to use to show the various photos i take of life, experiences, designs made and things that inspire me, so keep an eye on  http://www.flickr.com/photos/eastdesign/ as it will add another dimension to what i do and what drives me. So I had best get back into the making and designing swing of things as i have alot to do and a lot of time to catch up on.

Friday, 7 December 2012

my new car

Another blog post long overdue so lets get straight into it. A bit of a change to the usual posts as i usually post about current projects or what im making, but if you have been following me on twitter you will know that i have bought a new car. Now coming from a car design background this proved a very difficult challenge, as my last car had been with me for 7 years! And being super critical (i am a designer) about every detail when it comes to cars or products, it took me a long time to finally choose a car that i knew i could live with for just as long.
  I had an immense list of requirements! mostly styling issues but also mechanical and reliability requirements, and as cars are one big ball of many aspects of design all wrapped up in metal, i had a big decision to make. I finally plumped for a peugeot 308. Now before you all go critising, i did not take that choice lightly and considered many other cars but found this to be the best all round in terms of good design! let me explain why.

From an ergonomics point of view car design has moved a long way from the cars of 12 years ago which i had, and the first thing that striked me sitting in this car was the amount of the outside world i could see from inside it. This appealed to me greatly as i like to see where im going obviously and some cars nowadays seem to have smaller and smaller glass areas for poeple to hide away in, why? So the vast amount of glass appealed to me and also gave me that extra visual awareness to drive properly and confidently (see where im going here? cars are required to do alot for many individuals and age ranges not an easy task) also the glass made the inside seem bigger where the outside of the car seemed smaller, another trick car designers use to give the ilusion of space. The seating position was perfect to take advantage of this increased viewing area and the interior controls, lights dashboard etc where all simply and intuitively designed to avoid prolonged looking down and taking your eyes off the road (another area where design is vitally important in car design, intuitive controls and operations) just on a side note on the glass area, have you ever been stuck behind a van or lorry while driving and been frustrated that you cannot see where your going, now put yourself behind a car with a large back window (the new crop of small cars like the citreon c1 or peugeot 108 do this beautifully) that allows you to see through that car and onto the road ahead! How much more satisfying is that? giving other road users a vital viewing area for traffic or dangers ahead. An area i think is overlooked completely in car design nowadays (thinking of other road users and not just the ones inside the car)

proportional this car is also a very good go between against small and big cars, again the design of the interior lends the user into thinking the car is bigger and hence cognitively safer, while large mirrors and minimal wheel overhangs allow easy maneourability and parking (well for me anyway) the list of design areas that need to addressed in car design is growing isnt it?

im not going to bore you with engine stats or perfromance becasuse that was never a requirement when i was lookng, i just wanted something economical (who doesn't) but in terms of engines, peugeot produce one of the best, which is encouraging. They designed many diesel engine features that are common place in many engines today and it is quiet! How many diesel cars do you hear that sound like tractors? people are funny things, some don't want to be noticed or seen, so for the shy conscious amoungst us this car appeals, but doesn't shout about it.

road noise is minmal, again down to good design (many years of design, sound proving, material selection etc) and above all the overall styling is very good, it was my main aim to get a car that looked good (i know its vain but us designers like things that look nice and work well) and this car does look good. A prominant face to the car which is distinctive and very peugeot (they have been very good over the years at keeping their brand well known and unique) a lovely clean DFL (draw force line, basically the crease that divides glass and body work when you look at the car side on) which defines the character, stance and proportion of the car.
  Also on another side note the indicator lights, main headlights and brake lights are all segmented well and so do not merge into one another when in use. Alot of new cars do this nowadays, where the indiator light (usually yellow), is hidden within the main headlights, hence when they are on it can be very difficult to see the indicator lights working. Which to me is a major oversight and a dangerous feature for other road users, lots of cars do this, audi, jaguar for example and it shows that car designers aren't really thinking properly about the interaction of the car and its controls on the enviroment its in.

anyway enough ranting as i can see this blog post getting longer and longer as i get my design hat on. what i wanted to prove in this post is that so much and i mean so much design goes into the humble car, more than even i could ever touch on. And proves that car designers don't have it easy. They have to cater for every age group and every ability and sometimes have to make assumptions and estimates as to how best the car should be used or driven. not easy in the slightest!

so my design hat comes off to the car designer!

oh and the boot is very big so i can get loads of wood in it on my travels.

Thursday, 22 November 2012

commission work out in the open

Just a quick blog post -between making a large amount of 'fort' candle holders, trying to gain interest in my work leading up to christmas and making some new prototypes for more storage ideas- to show a couple of photos of the award i made for a local business awards ceremony organised by the Eastern Daily Press newspaper and Lexia Media who commissioned me to make an environmental and sustainability award for the best performing company in this field in East Anglia.
  The photos were taken by local photographer Angie Sharpe (many thanks to her for letting me show the photos) and thanks to Archant publishing for releasing them.
  Its great to see the award i made with the finished brass plaque applied and given to the lucky winners. It looks great and i hope it will take pride of place in their office. One thing i did notice from looking at the photos was the amount of glare that the award got from the lights and camera flash. if you read my previous blog post you will realise i prempted this and was cautious about not putting too much of the gloss lacquer on the lighter coloured Ash wood. So it just goes to show that the designer has to think of every aspect of the design and project as a whole from materials and their interaction with the end user and enironment, to simple issues like size and colour.


so hopefully the more commissions i do i will be able to share the results and views on this blog and hopefully highlight the importance of why designers have to always be thinking ahead and of every eventuality. 

Sunday, 4 November 2012

and the award goes too...

So if you have been following me on twitter you will know that i have been doing a little commission piece for a client and i can finally blog about it. I was approached by Lexia Media which is a PR and marketing company based in a beautiful town near me called Woodbridge. They wanted me to make an award for a business awards ceremony organised by a big local paper. The award would be presented to a company that have achieved outstanding environmental and sustainable targets in the year, hence why they wanted a locally sourced wooden award. So i naturally jumped at this chance as i also negotiated getting my name and details printed in the award ceremony brochure and the local paper as well which is distributed already the eastern counties. So it was a great opportunity to gain exsposure for my work and what im trying to do. Numerous email conversations then started with Lexia Media to workout what they wanted and how best to make this piece.

It is too date the smallest thing i have made which surprsingly created alot of headaches in itself, it might not look a technically challenging design but working out the angles and plaque sizes proved to be quite stressful at some points and the old 'making something for someone other than yourself' always adds a bit of pressure. The shape was decided from the outset as it had to fit in with the other awards being presented. But i advised them on material choice-which was Ash and Sapele- and the overall size. Once all this was done i started making it. This took longer than i thought and i also had to consider what finish would be applied as it could not be too glossy due to photographs being taken of it at the ceremony which would have reflected off it and made the plaque unreadable. But i was pleased with how it looked and also how i handled the smaller scale of this commission. I chose a spray on lacquer for the finish as this would give a high gloss professional finish and protect the wood. I thought that an oil finish would not be right for this commission and might not be a desirable look for this piece. The photos show the beautiful grain pattern of the sapele plinth which is great. Sapele wood still impresses me, such a versatile wood.

The photos show the piece without the plaque which apparently will be fitted onto it before the ceremony so i will hopefully post some images of it in the hands of the lucky winners soon. But alot of lessons were learned from this small commission, which will help me in future projects like liasing with clients and determining their exact requirements as early as possible and also talking to other people who may be involved, so i am aware of every eventuality and hence not get caught up or surprised with sudden changes.

I'm hoping this little piece will open more doors in my quest to do what i love.


Saturday, 20 October 2012

working away

So since my last post things have been quite hectic here hence the long pause between blog posts but now i have time to update and explain what i have been up to. As mentioned previously the new designs i have been featuring on my blog and various portfolio sites have proved popular and i have just completed making some new adapted designs of the coat rack and 'beam' desk accessories for the big blue sky shop in north norfolk which currently sells my 'cant' sidetable. They also wanted to sell a couple more of one of my very first designs the 'scape' mirror. This news was greeted with relief, joy and panic. Happy that again my designs are proving popular and being liked but also panic in how i would get all these designs made in time. So the past two weeks have been very busy indeed getting these made and packaged up, for a very long trip to north norfolk tomorrow (21/10/12) which I'm looking forward too. I will take along my camera and try and get some landscape shots of the beautiful north norfolk coast. as its rarew i gat a chance to go up there. so below are some images of the improved coat rack made from a lovely piece of ash heartwood (i made two identical but only photographed one)


the changes made to the coat rack have certainly improved the design no end and have added a rustic element to it but still retaining that modern functional element. again i let the wood sing, so when i saw this heartwood ash i had to buy it, even iif it did cause some headaches while machining it. The 'beam' desk accessories have also had a change with the addition of some accent colours on the end sections and added functionality by way of a slot at one end to add business cards, notes etc. all giving the simple shape added elements that the user can tailor to their requirements.


So once all these products are dropped off in north norfolk I can make a start on my latest commission! A small commission but never the less its a commisson and something different. I have been asked to design and make a Trophy for a local business awards evening. Something totally out of my comfort zone and unique, so i jumped at the chance. I'm currently working out the design in good old CAD and then i will get it made and then engraved ready for the ceremony. Its certainly a good chance for me to promote myself to a So its an exciting project, but.. with a tight deadline, so every day counts really.
  I have also set up a tumblr acount so keep an eye on here and twitter to see what i post and show. It will hopefully be an outlet for me to show my work in progress and other elements of my projects that you don't get to see normally. And when i find time i have some rather different designs that i can't wait to produce and show on here, all based on personal experiences and adapting everyday elements. So some good stuff ahead.

Monday, 1 October 2012

a day in london and new ideas

so my last post detailed some new designs i had been making and im pleased to say they are proving popular in that short time, it seems people warm towards unique but functional designs. I dont know if its because people want value for money nowadays or just something sensible that will last, but its encouraging and spurs me on to explore this direction more. So based on that i am making some more desk accessories with some added colour. Now to most people adding colour is no big thing but this will be the first time i am adding colour to my designs as i have always worked with the natural pattern of wood, so covering it up is going to be a shame but its something that needs to be done. So i spent a long time choosing and testing colours last week and working out what the colour should represent, (its function i suppose). So when we get some decent light in this country (think i suffer some that seasonal affective disorder) i can make some more 'Beam' and 'Beam Plus' trays and add some purposeful colour to them to highlight the shape more and showcase better usability.
  As well as adding to my most recent designs i have come up with a few new ideas based on this minimalist functional desk accessory route i am taking. So expect more ramblings on twitter about these new ideas and then some detailed images on here in due course. But i need to start getting some lighting materials and look into lampshades for these new ideas (little clue there) so another area i have not ventured into before. Why do i make things hard for myself

while all this was going on i went to london for the day when the brilliant design ferstival was on. I had not been since 2010 so i was excited to go and intrigued to see what had changed. Alot was the answer, i just stuck to the three main shows, tent, design junction and desingersdblock and got so much inspiration and encouragement to help with my own designs and it certainly made me think about exhibiting there next year, but thats a big decision and i will see how this year pans out first. But the quality of the work on show was incredible, the best ive seen, so many big names with fautless craftmanship and small one man bands who equally competed with the big names, really gave me hope that did. Its a shame i dont live in london really, i always dread going but when im there its fantastic, you can people watch for hours, (a very important thing for a designer to do) and the scope for getting noticed is immense. But i love my norfolk too much and want to prove that you can make it big and design beautiful functional objects outside of london.

as well as everything else i am on the hunt for reclaimed wood with a renewed optimisum. I have found some old reclaim yards that i need to visit, so will make time for this as im on the hunt for some old oak, which i feel will be a task in itself. apart from that its business as usual, promoting my designs as best i can and making when i can

still think i need my own website though

Thursday, 20 September 2012

my design week

So as its design week in London I have been having my own design week in Norfolk and have made three of my designs that have been burning a hole in my sketchbook and my head for a while now. As detailed in previous blog posts and tweets, I have been working on some desk accessory ideas, -born out the need to start making some smaller designs as mentioned in previous posts- and thought it was high time to get them made. I have way too much sapele wood at the moment and thought this would be the best material to try ideas out on as it finishes really well and I have worked with it before.
  The idea behind these accessories was to create an accompliment to a free standing desk or working space, so I wanted the aesthetic pared down and the function to shine through.  As to me accessories seem to be singular in there function and not achieve the multi-use that people now use their desks for, what with people having more possessions and working from home for example too. So my designs are based around these ideals.


  So the first design is a simple tray with proportions based on normal pens and pencils but with added depth for adding anything that the user would want to keep too hand and organised (phone, keys, small change). The base is felted to avoid scratching and add some colour to the piece. But the simplicity of this highlights the function of it which is only limited by the user.
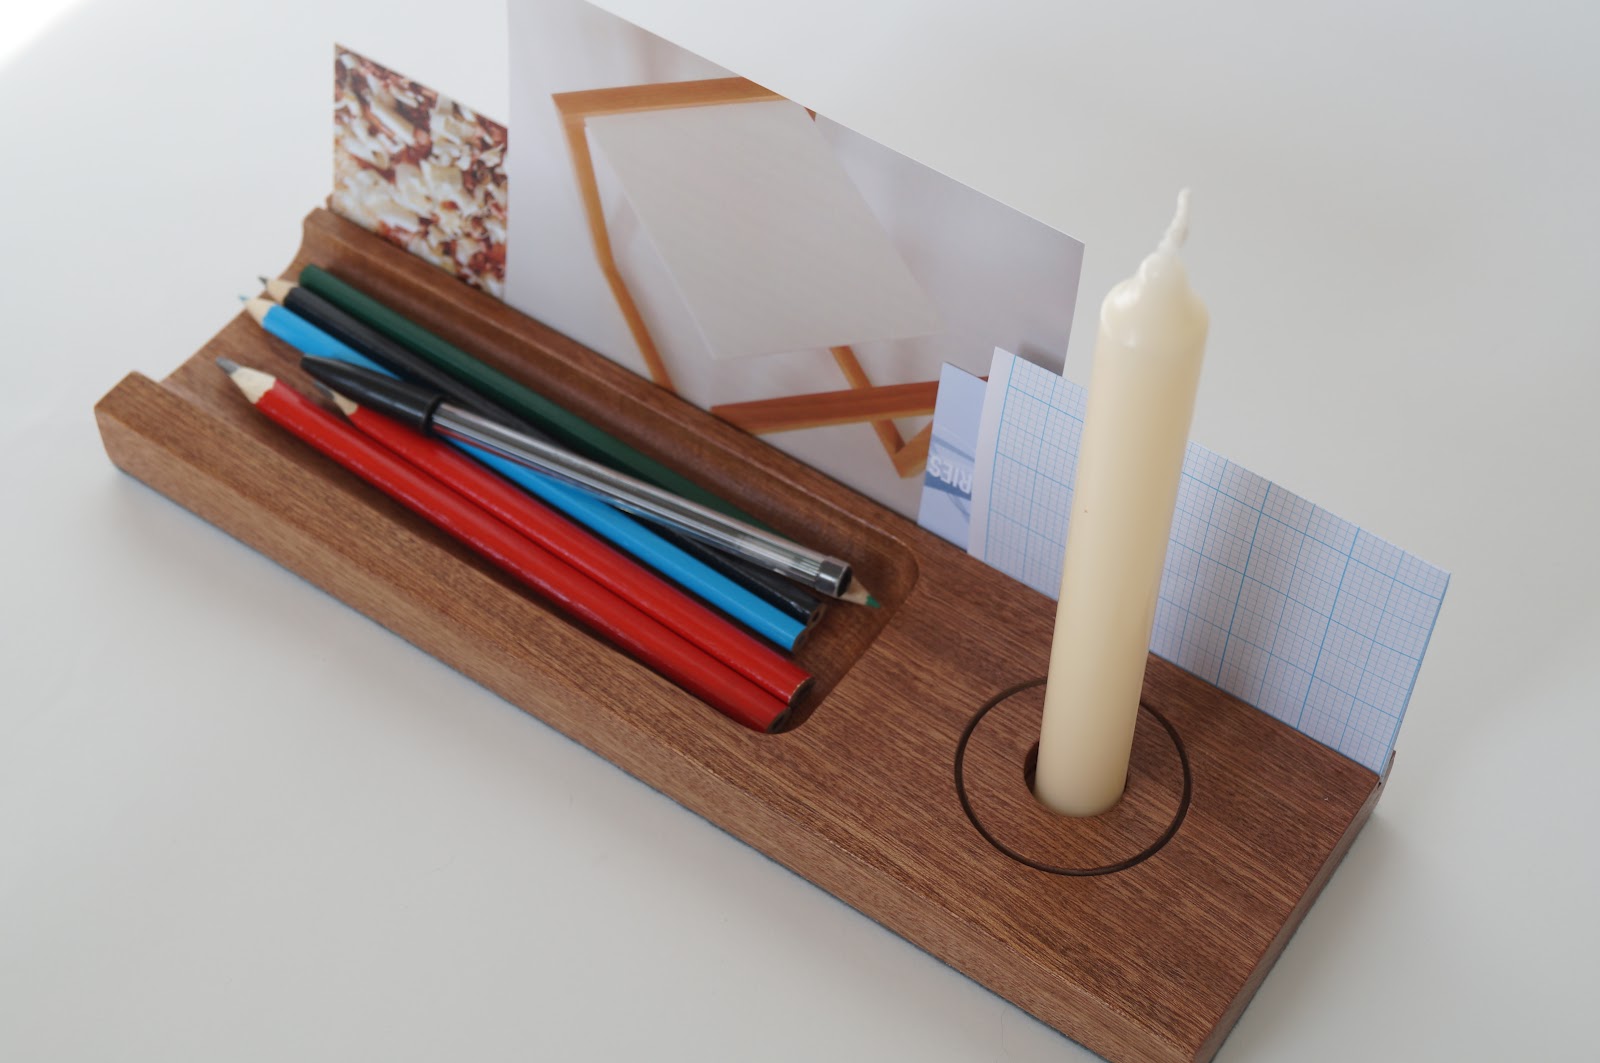
  The second design takes the tray idea further and adds some more functional elements to increase its usage. The first is a simple slot running the length of the piece which acts as a notice board to store anything the user may need for inspiration or daily tasks, cards, notes etc. further freeing up the desk space and creating order and a base for the users belongings and important items. The other noticeable feature is the circular detail at the other end of the tray which again performs two functions. It can be used to store paper clips or loose items, even a candle! But by placing a rolled up piece of paper or card in the circular slot you then created another area to store pens, pencils, rulers etc. Giving total freedom to how they use it. Proportions have only changed from the first tray along the length to accommodate this unique circular slot.


  So from just a simple oblong section of wood, function and pared down aesthetics have created a very usable desk accessory that can be used in so many ways. Only one tool was used to make these designs, my trusty router. And I can see these designs made from any hard wood to match whatever scheme the user has on their desk/room.  I will be showing and selling these desk accessories in my shop on www.stylisticgallery.com very soon, once I can obtain some different wood. And on my coroflot portfolio page.
  The third design I have made is an idea for a coat rack using sapele wood again and ash for the peg hooks. The difference with this idea is that a slot has been added to the top backing plate which as the photo shows allows papers, letters, postcards etc etc to be placed along its length. Giving this coat rack a unique extra function.  As not every hall way is bigger enough to have a free standing coat rack, this idea came about trying to give the humble wall mounted coat rack some added value in confined spaces. I played around with many different ideas based on this theme which I will probably make one day but I wanted something that looked simple and uncluttered that the user could adapt and customise. Again this design will be available to buy soon in a choice of woods. The next stage will be to add to the desk accessories I have made with more designs based on this theme of multi use and further exploit this idea of space saving.


Sunday, 9 September 2012

thinking small

time for a brief update since my last post which detailed my 'fort' candle holder which currently i am making in bigger versions to sell on my online showcase at www.stylisticgallery.com I have also started to make some desk accessories now as i have had many ideas in countless sketch books that i just needed to make, out of all the scrap tropical hardwood i have left over from previous projects. My descision to make some smaller items didn't come lightly as i wanted to try and continue making bigger items of furniture but with limited space, limited time and resources i have to just market what i have at the moment and pusd on with my commission work.
  So whats left of the summer sun is used to good effect at the moment crafting these desk accessories which will of course be online as soon as they are made. Deciding what accessories to make in an age where working has changed dramatically due to mobile phones and the such, proved difficult and if any one has any suggestions to other items of desk accessoires that could be made let me know. As it was a tough decision coming up with designs that were needed on a desk in this day and age that could be used by a wide demographic. So i concentrated on function and pared down style and letting the wood speak for the design. As i see these accessories as a fairly high end aesthetic that suits the tight grain of the sapele wood i need to source some leather to add to these designs so they can be used on a variety of surfaces. As with alot of what i do its all new to me making smaller items so its a big learning curve for me, but one i am relishing. So i am hoping these accessories will represent a new direction in my work, a move towards smaller items that can be crafted from more expensive hardwoods and also show off my creative thinking.

while constructing these new designs i am also continuing marketing my work which is viewable on www.craftcentral.com and trying to find other shops and galleries to show my work. It will take a while i feel. I am also gearing up for the brillaint london design festival. I have alot to see as i won't be exhibiting my work so i am going along to check out what everyone else is doing and pick up loads of tips and ideas. You can learn alot from just watching and observing remember. It will be a great time in the big smoke as the world has been centred on the city it seems, i will hopefully get a chance to walk around the olympic park and marvel at the architecture too.

so a busy few weeks ahead, but the goal is still the same. the journey continues

Tuesday, 28 August 2012

scrap wood done good

If you have been following me on twitter and reading my blog you will know that I haven’t got any major furniture making to do at the moment for clients or shops so I thought that it would be a good time to try and use up all the scrap wood I have accumulated over the months and also try some new ideas out that have been in my sketchbook for a while now. Most notably desk accessories and oddly, candle holders.
  Now this isn’t my usual bag so to speak as I would much rather be making a nice desk or table but there is only so much furniture a man can make and store! Without being overrun with it all and nowhere for it to go. So turning my hand to something smaller seemed the logical step.
  I have lots of scrap wood lying about from Sapele to American White Oak and the overriding thing that struck me was I wanted to create some objects that did not detract from the overall look of the wood (the grain, pattern, form) so I played around with simple ideas where function was the leading aspect, so the wood stood out.

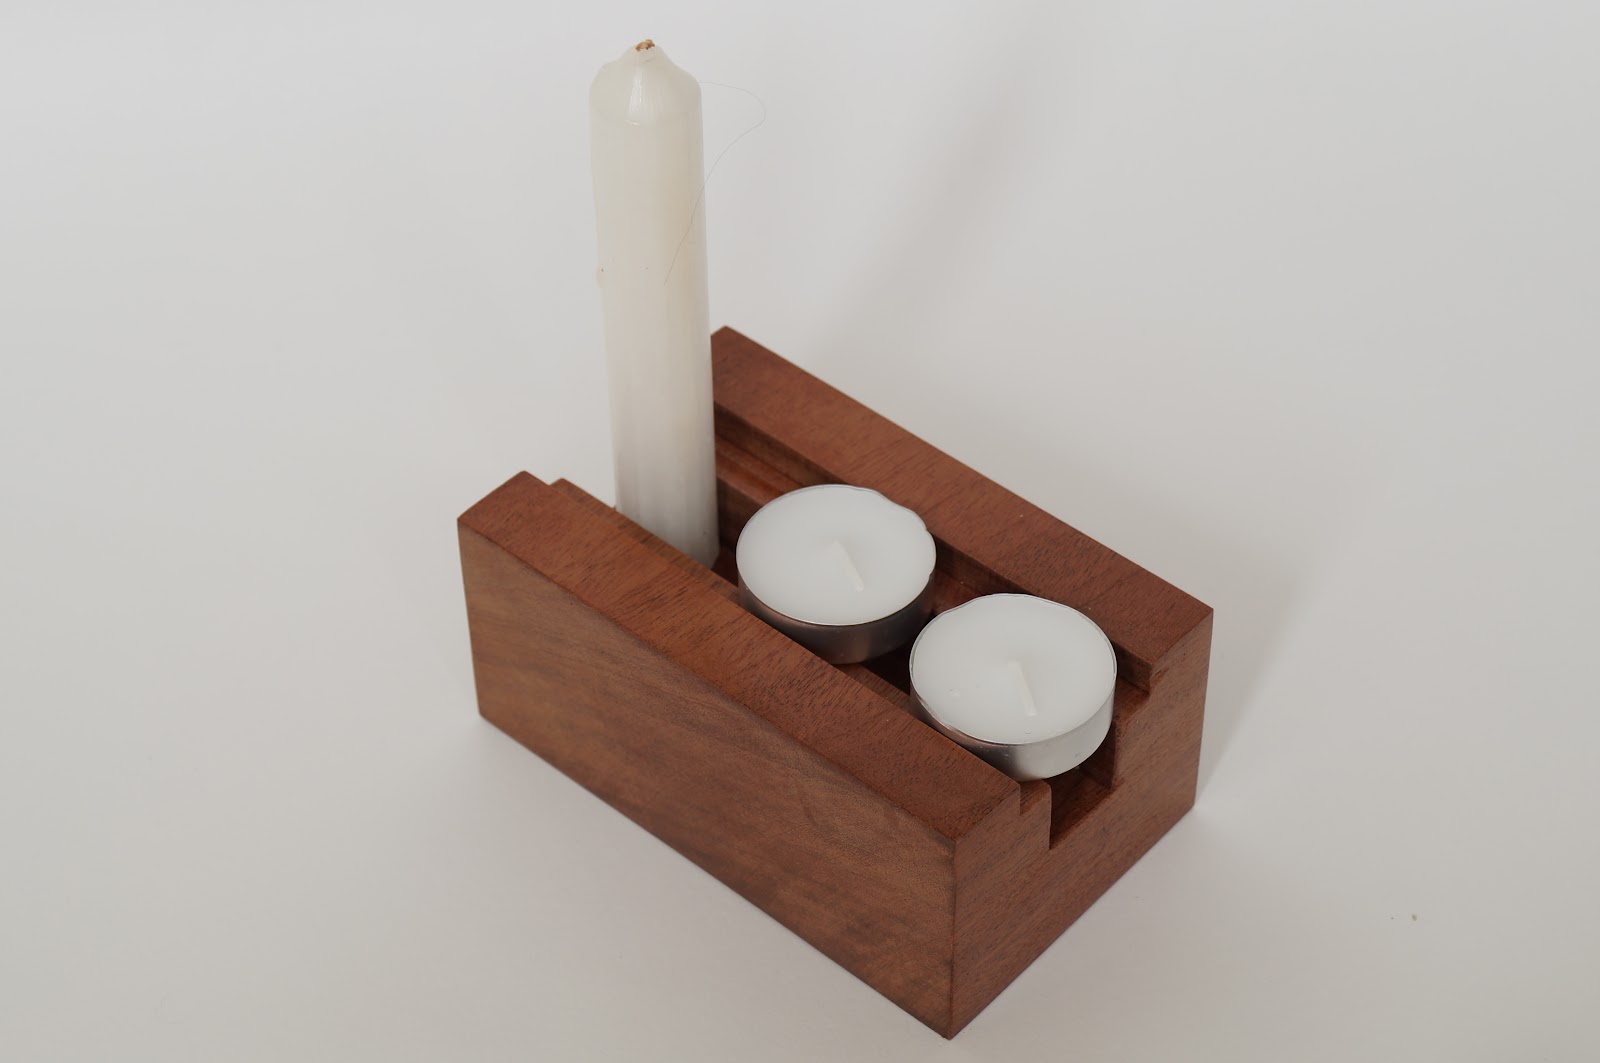
  As many of you know my favourite tool at the moment is the router. Such a versatile tool and one I have used to great effect in other projects detailed in this blog, so I knew with this tool I could create/change an object without taking too much of the wood itself away. And still leave something unique and usable. So I simply and if I’m honest quickly created what I like to call the fort (because it looks a minimalist castle) it’s a very basic candle holder made from a block of Sapele wood (but any wood could be used) which has a section cut right through it to house, crucially two different types of candles. This was important. I didn’t want such a basic design to be basic in use so having the option of it using normal candles (wedged into the first cut through section) as well as good old tea lights in the second cut through section, gave it a little bit of customisation (see photos). The idea is to have small forts dotted around a table or area, and also long fort sections that house 10 tea lights or more, or a mixture of normal candles in a row to create a modern simple (and a little bit dramatic) light source.


To me this basic design was pleasing to the eye and gave new life to old scraps that I would have never known what to do with. I intend to display this design and its bigger brother on the numerous portfolio websites and then hopefully get it ready to be bought on the great www.stylisticgallery.com

Monday, 20 August 2012

the writing desk


Finally another blog post I hear you cry, I know it’s very long overdue again but I have been very busy making some of my designs to show in another local shop. The Living rooms is a fair-trade sustainably sourced furniture shop that stock a large range of furniture from outdoor to dining ranges, and they approached me to see if I was interested in showing my designs in their vast shop, I jumped at this chance and so if your ever in Norfolk you need to pop down and have a look, my work will also be featured on their website too. So it’s really good news for me, meaning my work is being showed in more shops now and not just online, so things a are looking up in terms of getting my designs out there.

Now back to the point of this post, to detail the design of my most recent design I did for a client in Yorkshire, a writing desk. The client approached me after seeing my designs for the ‘cant’ side table and console table and asked if I could come up with a similar design for a desk. Obviously I jumped at the chance as it was my first commission and I really needed to start making bigger items of furniture too.  So i sat down with them and sketched out a few ideas and found out exactly what they wanted from the desk. This took a few hours as I had to factor in the restraints of space I was working with and what they were hoping for, so a big compromise all round. Once they were happy with the initial idea I made a quick mock up to make sure I had the ergonomics spot on and the overall form was to their liking. Unfortunately I don’t have any photos of the mock up but it was very basic and proved a point. Thus making the next stage much easier in working out the final dimensions and how the design was going to work.

As the ‘cant’ design series relied on the cantilever principle I could not adopt this technique to the desk, because it would require an extremely heavy and robust frame to support the cantilever and the frame work its self would have to be very thick to take the weight that the desk would have to support, so I came up with an aesthetic  idea of the having the desk top resting on the framework but still fixed inside the frame at one end like the side table and console table this desk takes it inspiration from. So then ensued a lot of CAD work to figure out how to make this resting idea work and work out the final details.

The client chose the wood (sapele) which pleased me as it’s a wood I like to work with and have a lot of experience with so was confident in working with it to produce a bigger design to what I am used too.  And the client was also happy to use 10mm thick acrylic as the desk top (the same combination used on the console table) which not only suited the overall look (an abstract minimal form) but would add a significant amount of structural support to the overall design.  As the frame work I was proposing was unproven and I needed to make sure the design was rigid enough to be used every day and support a fair amount of weight (books, laptop, printer) etc. So more CAD work was needed to assess the need for a central support which would run along the bottom, this not only unhindered the overall look but provided vital rigidity.

Once all the design and CAD work had been done it was time to start making. I acquired the sapele wood from my local wood yard and ordered the black acrylic from a local company. As this was the biggest project I had done I felt a bit daunted by the overall project in hand but I learnt so much from the whole process. Making the framework was quite simple and just needed an extra pair of hands when it came to gluing. The difficult part came when I had to marry the acrylic to the frame work. It required some tricky routing and drilling and because the wood is such a strong contrasting material against the acrylic I had to design in some features to allow the frame to move and shrink. But after a lot of head scratching and huffing and puffing the basic desk was complete and all that was left was to conceal the fixing bolts (by veneering the top brace at the back where the acrylic sits inside) and then finish the bare wood with Danish oil. This beautifully darkened the sapele to add depth and worked amazingly with the gloss black acrylic.